Autowired注解依赖注入原理
Spring 提供了 @Autowired 注解,可用于自动注入所需的 bean,与 xml 配置相比更加简洁,本文主要关注 @Autowired 注解的实现原理。
Autowired 注解用法
Autowired 注解的定义如下:
1 |
|
它可用于构造函数、普通方法、参数、field 等,包含一个 required 属性,默认值为 true。
使用示例
定义一个 BusinessService 接口,它的实现类为 BusinessServiceImpl,在 BusinessServiceImpl 上添加 @Service 注解,表明这是一个 Service 类型的 bean。
1 | public interface BusinessService { |
使用时只需要在目标 bean 的 BusinessService 属性上加上 @Autowired 注解即可,Spring 会自动完成依赖 bean 的注入。
1 |
|
Autowired 实现原理
Autowired 注解的依赖注入是通过 AutowiredAnnotationBeanPostProcessor 来实现的。
AutowiredAnnotationBeanPostProcessor
AutowiredAnnotationBeanPostProcessor 类的继承结构如下图所示:
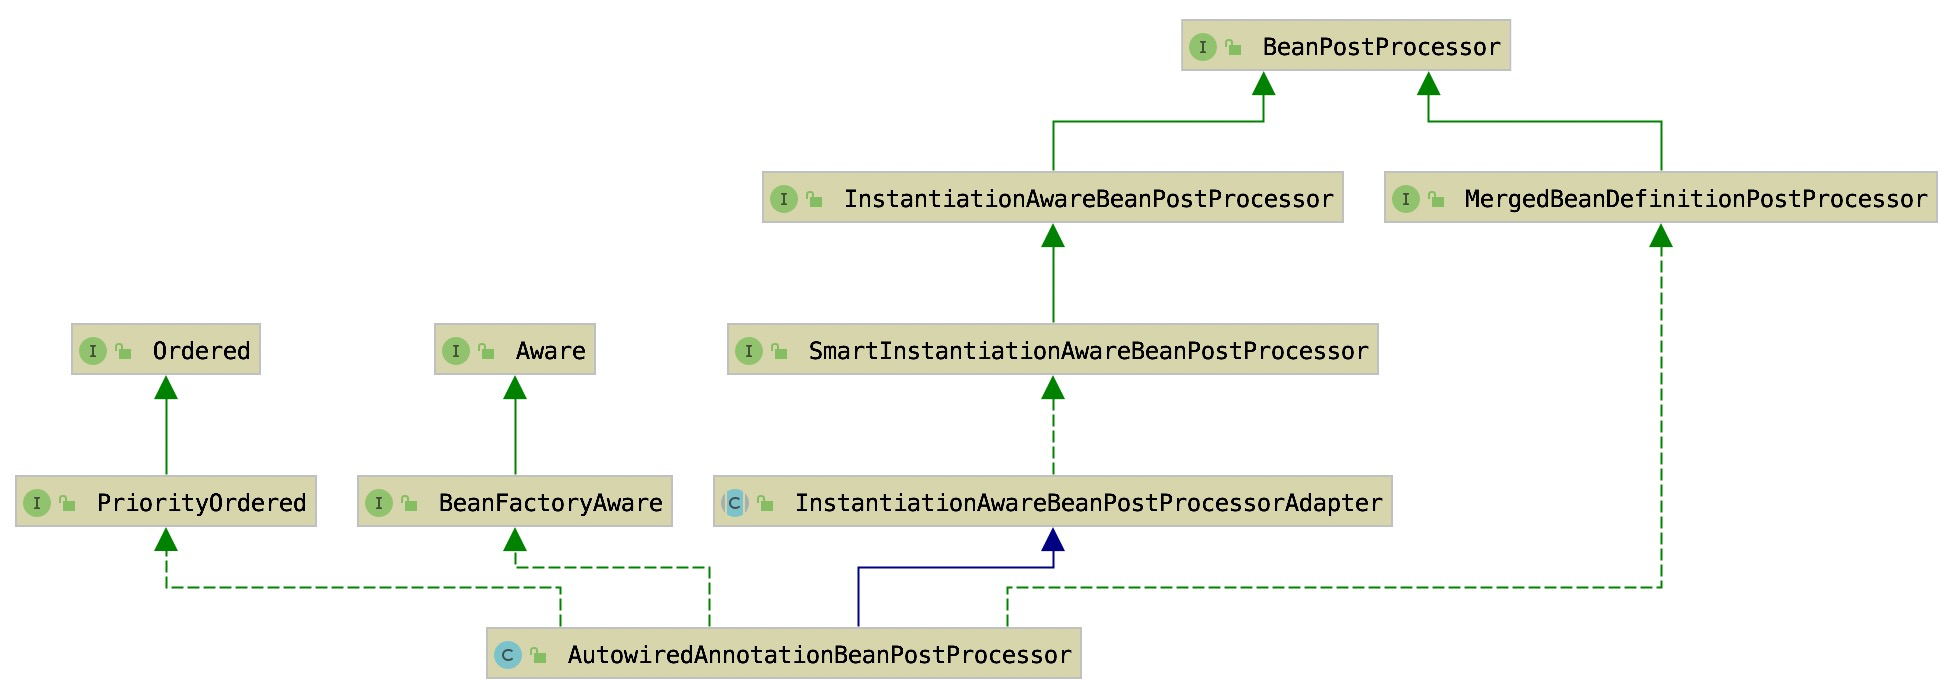
它实现了多个接口,这里主要关注如下两个接口:
MergedBeanDefinitionPostProcessor接口。提供了一个postProcessMergedBeanDefinition回调方法,可用于处理 MergedBeanDefinition。1
2
3
4
5
6
7/**
* Post-process the given merged bean definition for the specified bean.
* @param beanDefinition the merged bean definition for the bean
* @param beanType the actual type of the managed bean instance
* @param beanName the name of the bean
*/
void postProcessMergedBeanDefinition(RootBeanDefinition beanDefinition, Class<?> beanType, String beanName);InstantiationAwareBeanPostProcessor接口。提供了一个postProcessProperties回调方法,可用于在 PropertyValues 应用之前对其进行处理。1
2
3
4
5
6
7
8
9
10
11
12
13
14
15
16
17
18
19
20
21
22/**
* Post-process the given property values before the factory applies them
* to the given bean, without any need for property descriptors.
* <p>Implementations should return {@code null} (the default) if they provide a custom
* {@link #postProcessPropertyValues} implementation, and {@code pvs} otherwise.
* In a future version of this interface (with {@link #postProcessPropertyValues} removed),
* the default implementation will return the given {@code pvs} as-is directly.
* @param pvs the property values that the factory is about to apply (never {@code null})
* @param bean the bean instance created, but whose properties have not yet been set
* @param beanName the name of the bean
* @return the actual property values to apply to the given bean (can be the passed-in
* PropertyValues instance), or {@code null} which proceeds with the existing properties
* but specifically continues with a call to {@link #postProcessPropertyValues}
* (requiring initialized {@code PropertyDescriptor}s for the current bean class)
* @throws org.springframework.beans.BeansException in case of errors
* @since 5.1
* @see #postProcessPropertyValues
*/
default PropertyValues postProcessProperties(PropertyValues pvs, Object bean, String beanName) throws BeansException {
return null;
}
通过下图可以了解它们处于 bean 创建的哪个阶段:
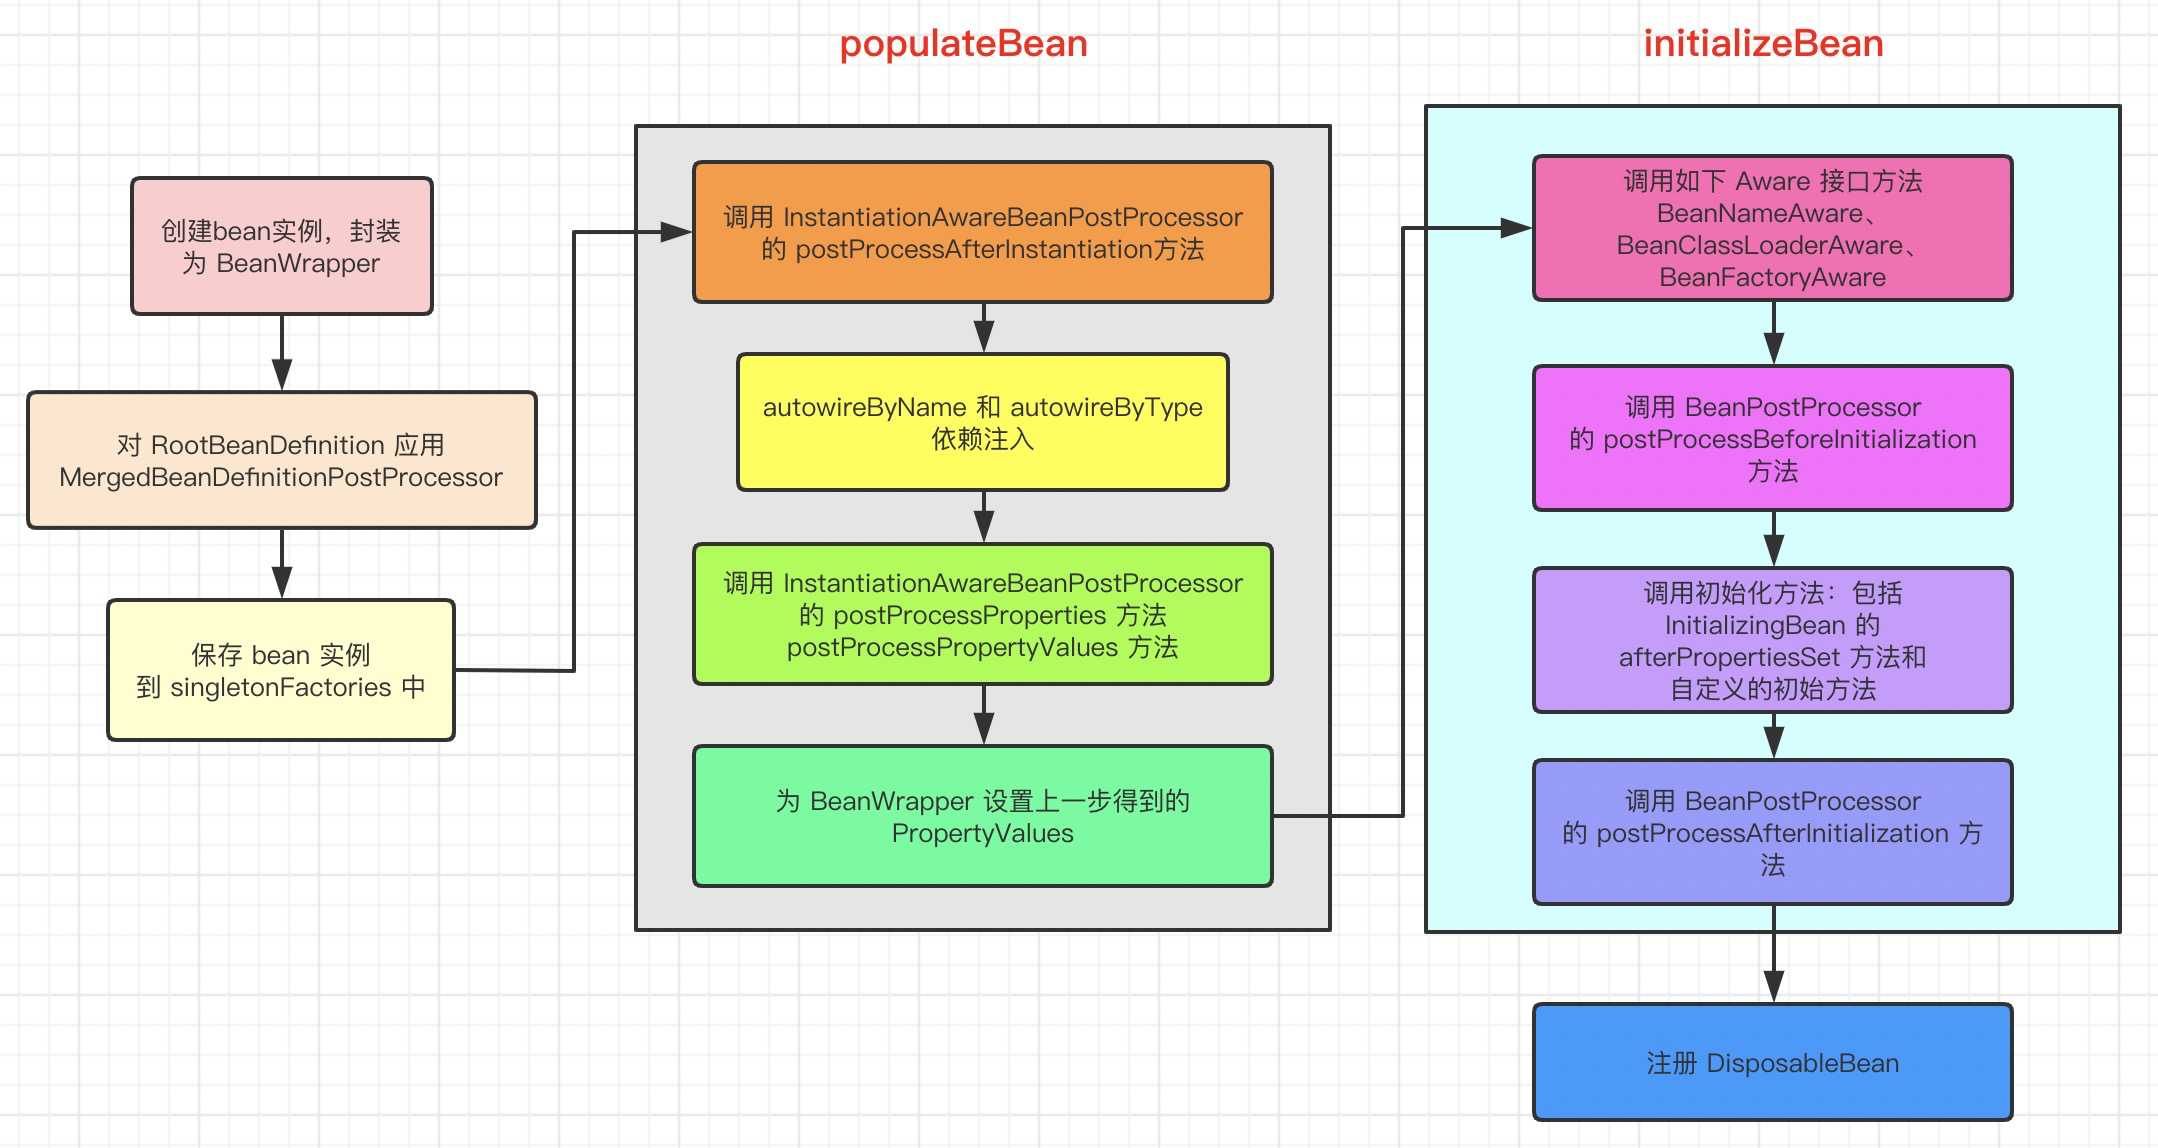
AutowiredAnnotationBeanPostProcessor 就是通过 bean 创建过程中的这两个扩展点完成 @Autowired 依赖注入的
- 获取 class 上的依赖注入注解信息,构建依赖注入元数据,添加到缓存中
- 查询依赖注入元数据,调用其 inject 方法,从 beanFactory 中获取依赖的 bean,通过反射设置 bean 完成依赖注入
获取依赖注入元数据
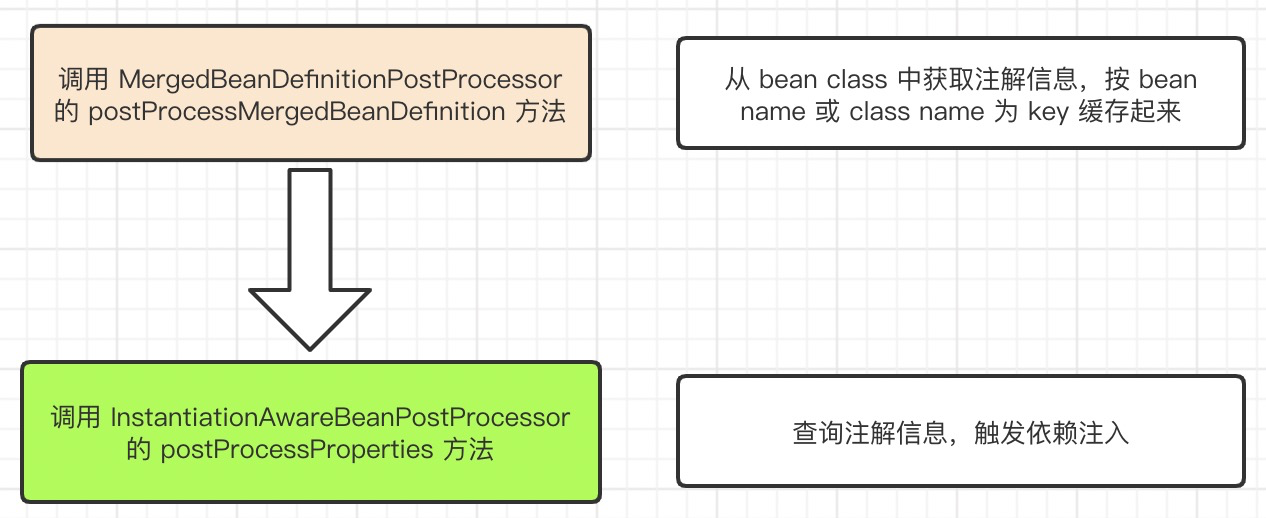
AutowiredAnnotationBeanPostProcessor 实现了 MergedBeanDefinitionPostProcessor 接口,通过 postProcessMergedBeanDefinition 回调方法完成依赖注入元数据的查找和缓存工作。
1 | public void postProcessMergedBeanDefinition(RootBeanDefinition beanDefinition, Class<?> beanType, String beanName) { |
构建出来的依赖注入元数据可能要使用多次,因此 findAutowiringMetadata 方法在第一次构建好数据之后会将其缓存起来,保存到 AutowiredAnnotationBeanPostProcessor 的缓存中,这个缓存的定义如下:
1 | /** |
使用时先从缓存查询,若查不到则进行构建,然后添加到缓存中
1 | private InjectionMetadata findAutowiringMetadata(String beanName, Class<?> clazz, PropertyValues pvs) { |
构建依赖注入元数据
@Autowired 注解可以应用到属性(field)上,也可以应用到方法(method)上,因此相应的元数据也包括这两种。
field 的处理
遍历目标类的属性(field),查找上面的依赖注入注解,找到后读取注解的 required 值,然后构建 AutowiredFieldElement 对象。
1 | ReflectionUtils.doWithLocalFields(targetClass, field -> { |
method 的处理
遍历模板类的方法(method),查找上面的依赖注入注解,找到后读取注解的 required 值、获取方法的 PropertyDescriptor,然后构建 AutowiredMethodElement 对象。
1 | ReflectionUtils.doWithLocalMethods(targetClass, method -> { |
构建 InjectionMetadata
获取到 AutowiredFieldElement 和 AutowiredMethodElement 之后,就可以构建 InjectionMetadata 依赖注入元数据了。
1 | return new InjectionMetadata(clazz, elements); |
它的两个参数分别为当前 bean 对应的 class 和从 class 上解析到的依赖注入信息
1 | List<InjectionMetadata.InjectedElement> elements = new ArrayList<>(); |
完成依赖注入
完成依赖注入的关键在于 InjectionMetadata 类。前面通过 MergedBeanDefinitionPostProcessor 的 postProcessMergedBeanDefinition 回调方法完成了 InjectionMetadata 的构建,但还没有真正地去注入依赖 bean。
依赖 bean 的注入是通过 InstantiationAwareBeanPostProcessor 接口的 postProcessProperties 回调方法触发的。
1 | public PropertyValues postProcessProperties(PropertyValues pvs, Object bean, String beanName) { |
因为在 postProcessMergedBeanDefinition 调用 findAutowiringMetadata 方法时已经完成了依赖注入元数据的构建,所以在 postProcessProperties 调用时是直接从缓存中获取到的。
这里依赖注入的核心是 InjectionMetadata 的 inject 方法调用,它的实现是遍历所有的 InjectedElement 对象,分别调用其 inject 方法完成依赖注入
1 | public void inject(Object target, String beanName, PropertyValues pvs) throws Throwable { |
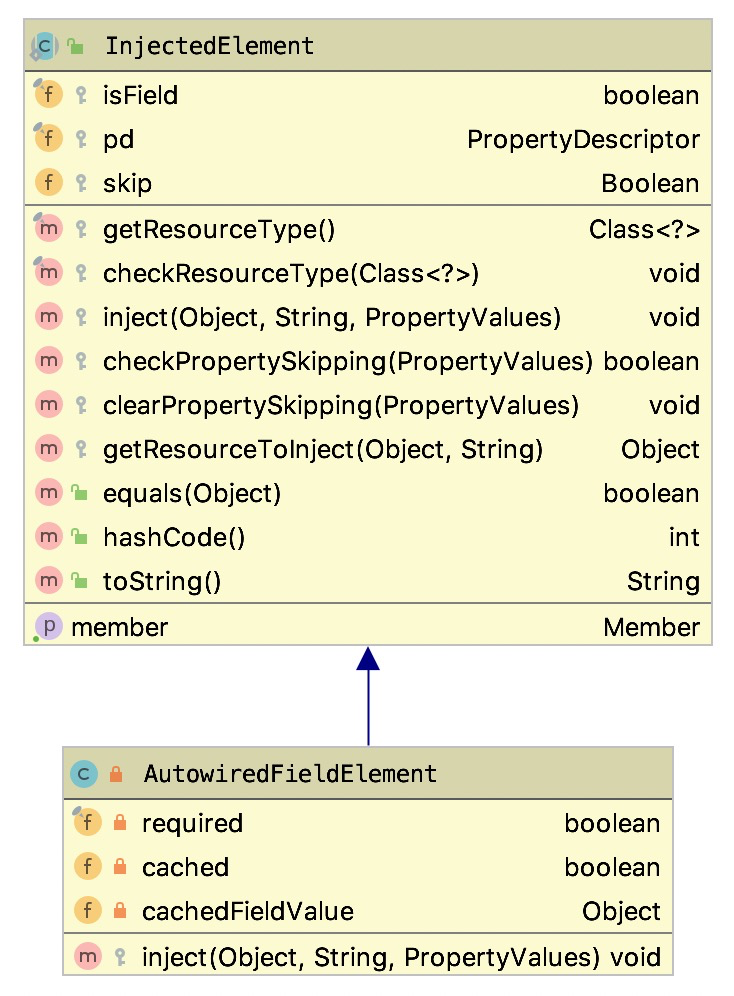
AutowiredFieldElement
AutowiredFieldElement 继承自 InjectionMetadata.InjectedElement,用于表示 field 上的依赖注入信息,它的类继承结构如下图所示:
我们主要关注的是它的 inject 方法
1 | protected void inject(Object bean, String beanName, PropertyValues pvs) throws Throwable { |
它的主要流程如下:
- 构造 DependencyDescriptor 依赖描述信息
- 解析依赖:从 beanFactory 获取所需的 bean
- 注册依赖关系
- 设置属性值
可以看出 field 依赖注入的核心是从 beanFactory 中获取所需 bean,通过反射设置属性值。
AutowiredMethodElement
AutowiredMethodElement 也继承自 InjectionMetadata.InjectedElement,用于表示 method 上的依赖注入信息,它的类继承结构如下图所示:
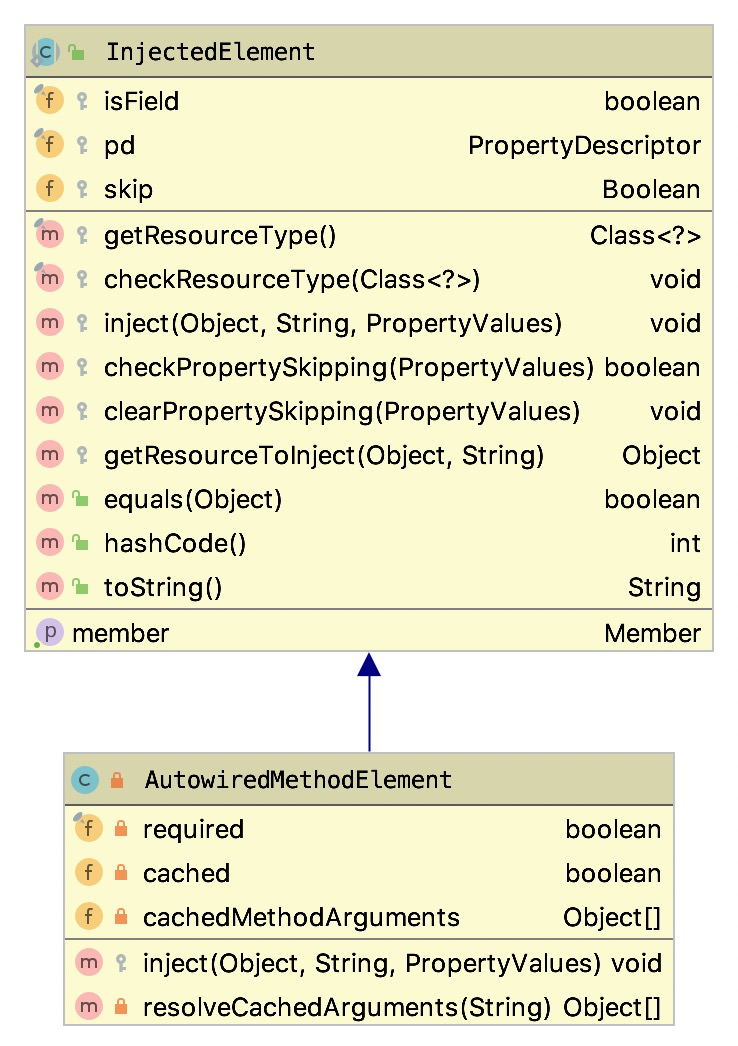
同样看一下它的 inject 方法
1 | protected void inject(Object bean, String beanName, PropertyValues pvs) throws Throwable { |
它的主要流程与 AutowiredFieldElement 的 inject 方法类似:
- 构造 DependencyDescriptor 依赖描述信息
- 解析依赖:从 beanFactory 获取所需的 bean
- 注册依赖关系
- 调用方法设置依赖 bean
因为参数可能有多个,所以这里需要循环处理每个参数
- 2020-04-05
MergedBeanDefinitionPostProcessor 是 Spring 提供的一种后处理器,它可以用于对 merged bean 进行一些操作。
- 2020-04-15
dubbo 是一个流行的 RPC 框架,它提供了一个
@Reference注解,用于配置依赖的远程接口,完成代理类的自动注入。本文主要关注@Reference注解的实现原理。 - 2020-01-22
XmlBeanFactory 可以说是 Spring 中一个最简单的 BeanFactory,通过它可以了解 Spring 的设计思路。
- 2020-03-31
当调用 BeanFactory.getBean 方法获取 Bean 时,如果 Bean 还未创建,则会触发 Bean 的创建,本文主要关注 Bean 的创建过程。
- 2020-04-06
InstantiationAwareBeanPostProcessor是BeanPostProcessor的子接口,新增了一个实例化之前(BeforeInstantiation)的回调、一个实例化之后(AfterInstantiation)填充 property 之前的回调