netty的Promise源码分析

netty 使用 DefaultPromise 完成异步操作,它对 jdk 的 Future 进行了扩展,提供了更丰富的功能。

DefaultPromise 的结构

DefaultPromise 的类继承结构如下图所示

image-20210203005444530

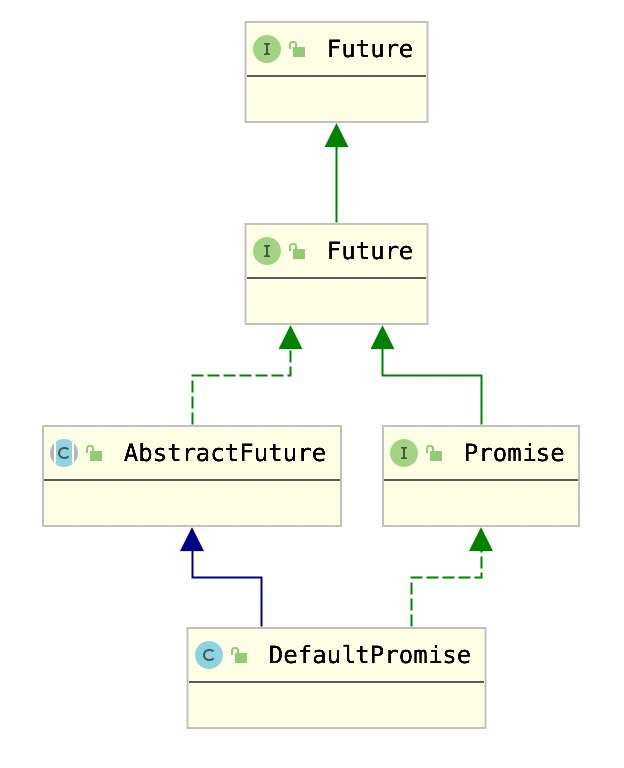
最顶层的接口是 jdk 的 Future,它用于代表异步操作的结果,netty 对其进行了扩展

io.netty.util.concurrent.Future

io.netty.util.concurrent.Future 对 jdk 的 Future 进行了增强,它增加了如下方法

image-20210203010012391

主要可以分为以下几类:

  • 获取执行的结果状态。是否执行成功、是否取消、获取异常信息
  • 添加、移除 Listener,用于监听执行成功事件并做响应处理
  • 同步等待执行完成
  • getNow 获取执行结果,非阻塞操作,若无结果则返回 null

io.netty.util.concurrent.AbstractFuture

AbstractFutureFuture 的一个抽象实现类,它提供了 get 方法的实现

1
2
3
4
5
6
7
8
9
10
11
12
13
14
15
16
17
18
19
20
21
22
23
24
25
26
27
28
29
30
31
32
33
public V get() throws InterruptedException, ExecutionException {
// 等待执行完成
await();

// 获取异常信息
Throwable cause = cause();
if (cause == null) {
// 无异常,直接获取结果
return getNow();
}

// 返回异常信息
if (cause instanceof CancellationException) {
throw (CancellationException) cause;
}
throw new ExecutionException(cause);
}

public V get(long timeout, TimeUnit unit) throws InterruptedException, ExecutionException, TimeoutException {
// 带超时的等待
if (await(timeout, unit)) {
Throwable cause = cause();
if (cause == null) {
return getNow();
}
if (cause instanceof CancellationException) {
throw (CancellationException) cause;
}
throw new ExecutionException(cause);
}
// 超时异常
throw new TimeoutException();
}

io.netty.util.concurrent.Promise

Promise 继承了 Future,它用于表示支持写操作的 Future

image-20210203011308782

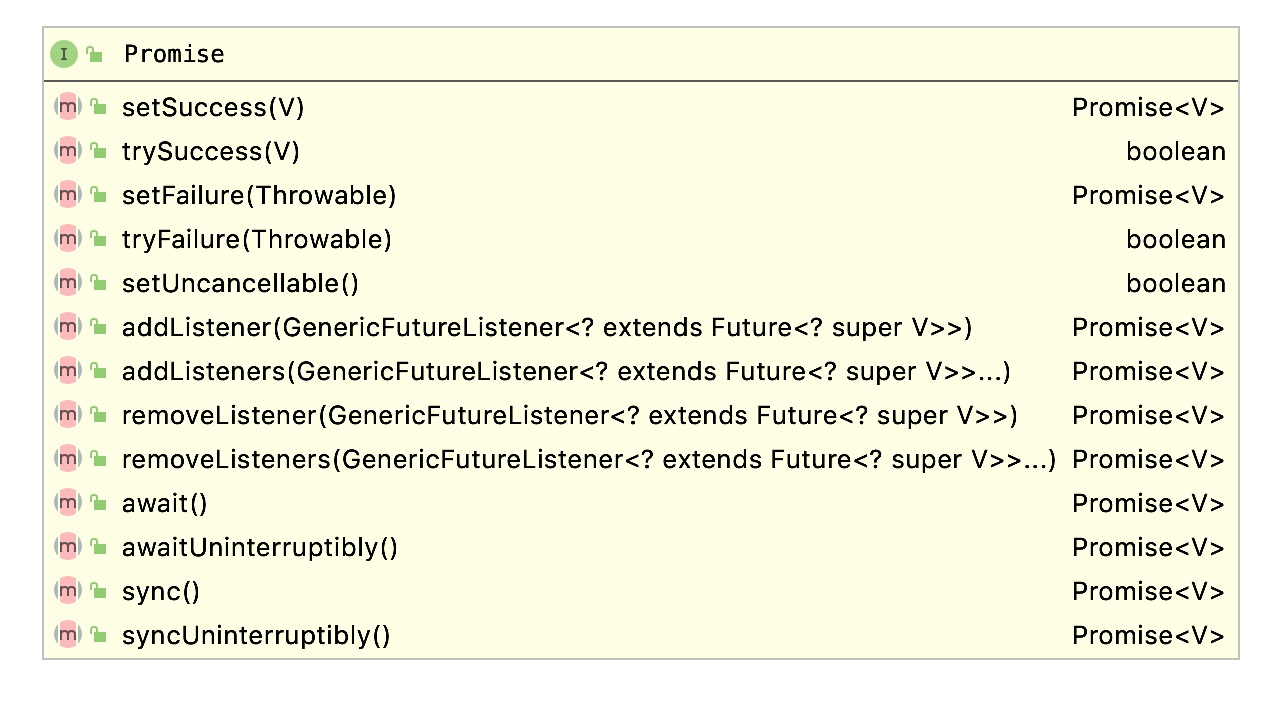
它相对于 Future 主要增加了设置执行结果的方法

  • 设置执行成功的结果。setSuccess、trySuccess
  • 设置执行失败的结果。setFailure、tryFailure
  • 标记 Future 不能取消。setUncancellable

io.netty.util.concurrent.DefaultPromise

DefaultPromisePromise 的一个默认实现类,它的主要属性如下

1
2
3
4
5
6
7
8
9
10
// 执行的结果,使用volatile修饰,保证可见性
private volatile Object result;
// 当Promise执行完成时需要通知Listener,此时就使用这个executor
private final EventExecutor executor;
// 要通知的listener,因为它可能是不同的类型,所以定义为Object类型,使用时再判断类型
private Object listeners;
// 要使用wait()/notifyAll()机制,这个变量记录了waiter的数量
private short waiters;
// 是否正在通知listener
private boolean notifyingListeners;

从属性中可以看出,DefaultPromise 使用了 Object 的 wait/notiry 机制

DefaultPromise 分析

接下来我们来看下它是怎么工作的,如下是一段示例代码

1
2
3
4
5
6
7
8
9
10
11
12
13
14
15
16
17
18
19
20
21
22
23
24
25
26
// 创建一个 Promise
Promise<?> future = new DefaultPromise(GlobalEventExecutor.INSTANCE);

// 添加一个listener
future.addListener(new GenericFutureListener() {
@Override
public void operationComplete(Future future) throws Exception {
// 当future代表的异步操作执行完成后,输出日志
System.out.println("operationComplete");
}
});

// 新启动一个线程,用于完成future的异步执行
new Thread(new Runnable() {
@Override
public void run() {
// 输出日志
System.out.println("before thread start");

// 设置future为执行成功
future.trySuccess(null);

// 输出日志
System.out.println("after thread start");
}
}).start();

这里创建了一个 DefaultPromise 示例,并且在一个异步线程中设置执行成功。此外往 DefaultPromise 中添加了一个 listener,当其执行完之后输出一行日志。如下是执行的结果

1
2
3
before thread start
after thread start
operationComplete

可以看到,当异步线程执行为 future 设置完执行结果之后,才触发了 listener 的执行

调用链路

当执行完 future.trySuccess(null) 这行代码时,最终会往 GlobalEventExecutor.INSTANCE 中添加一个任务,它的调用栈如下
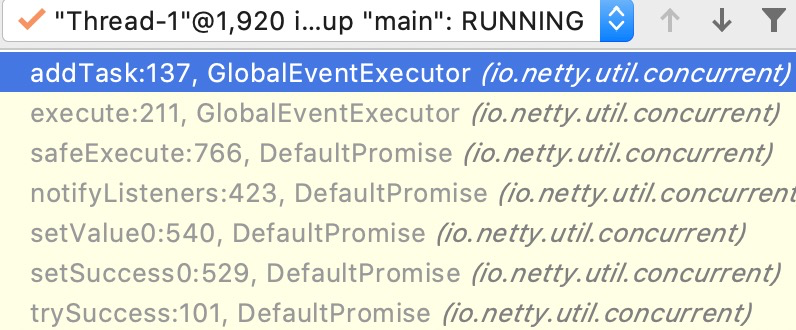
image-20210203014316688
1
2
3
4
5
6
7
8
9
10
11
12
13
14
15
16
17
18
19
20
21
22
23
24
25
26
27
28
29
30
31
32
33
34
35
36
37
38
39
40
41
42
43
44
45
46
47
48
49
50
51
52
53
54
55
56
57
58
59
60
61
62
63
64
65
66
67
68
69
70
71
72
73
74
75
76
77
78
79
80
// 1. DefaultPromise#trySuccess
public boolean trySuccess(V result) {
return setSuccess0(result);
}

// 2. DefaultPromise#setSuccess0
private boolean setSuccess0(V result) {
return setValue0(result == null ? SUCCESS : result);
}

// 3. DefaultPromise#setValue0
private boolean setValue0(Object objResult) {
if (RESULT_UPDATER.compareAndSet(this, null, objResult) ||
RESULT_UPDATER.compareAndSet(this, UNCANCELLABLE, objResult)) {
if (checkNotifyWaiters()) {
// 这里
notifyListeners();
}
return true;
}
return false;
}

// 4.DefaultPromise#notifyListeners
private void notifyListeners() {
EventExecutor executor = executor();
if (executor.inEventLoop()) {
final InternalThreadLocalMap threadLocals = InternalThreadLocalMap.get();
final int stackDepth = threadLocals.futureListenerStackDepth();
if (stackDepth < MAX_LISTENER_STACK_DEPTH) {
threadLocals.setFutureListenerStackDepth(stackDepth + 1);
try {
notifyListenersNow();
} finally {
threadLocals.setFutureListenerStackDepth(stackDepth);
}
return;
}
}

// 这里
safeExecute(executor, new Runnable() {
@Override
public void run() {
notifyListenersNow();
}
});
}

// 5. DefaultPromise#safeExecute
private static void safeExecute(EventExecutor executor, Runnable task) {
try {
executor.execute(task);
} catch (Throwable t) {
rejectedExecutionLogger.error("Failed to submit a listener notification task. Event loop shut down?", t);
}
}

// 6. GlobalEventExecutor#execute
public void execute(Runnable task) {
if (task == null) {
throw new NullPointerException("task");
}

// 添加任务
addTask(task);
if (!inEventLoop()) {
// 启动线程
startThread();
}
}

// 7. GlobalEventExecutor#addTask
private void addTask(Runnable task) {
if (task == null) {
throw new NullPointerException("task");
}
// 添加到队列
taskQueue.add(task);
}

注意第 6 步,添加完任务后,因为当前并不是在 eventloop 线程中执行,所以会执行 startThread 启动线程。

此时该线程会从任务队列中获取任务执行,因而会获取到第 4 步添加到 exector 中 Runnable 任务 notifyListenersNow,它的调用栈如下:

image-20210203015604777

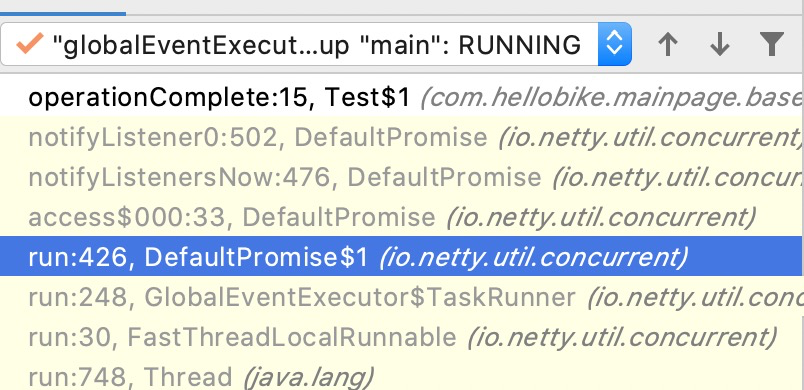
notifyListenersNow 最终调用 notifyListener0 通知注册的 listener

1
2
3
4
5
6
7
8
9
10
// DefaultPromise#notifyListener0
private static void notifyListener0(Future future, GenericFutureListener l) {
try {
l.operationComplete(future);
} catch (Throwable t) {
if (logger.isWarnEnabled()) {
logger.warn("An exception was thrown by " + l.getClass().getName() + ".operationComplete()", t);
}
}
}

总结

DefaultPromise 通过 Object 的 wait/notify 机制实现线程间的同步,通过 volatile 属性保证线程间的可见性

DefaultPromise 支持注册 listener,当任务执行完成时通知 listener,这采用的是设计模式中的观察者模式。

DefaultPromise 需设置 Executor,当通知 listener 时,不是在主线程中执行,而是在 Executor 中执行