netty 的启动流程分析
netty 是一个基于异步事件驱动实现的网络编程框架,它的内部使用了大量的异步编程方法,这是它性能高效的一个原因,但同时也使得代码阅读起来更加困难,本文就尝试分析下它的启动过程
按照惯例先上源码,这一段是 netty server 的启动代码
1 | EventLoopGroup eventLoopGroup = new NioEventLoopGroup(); |
对应的 Handler 代码如下
1 | public class EchoServerHandler extends ChannelInboundHandlerAdapter { |
我们可以通过调试一步步跟踪代码的执行流程,由于以下原因,调试的流程可能不那么流畅
- 注册 FutureListener,在任务执行完后通过回调执行相关逻辑
- 提交任务到 EventLoop,将任务放到 EventLoop 线程中执行
为方便跟踪代码,特将整个启动流程的执行顺序梳理出来,进而整理成下图所示的流程图
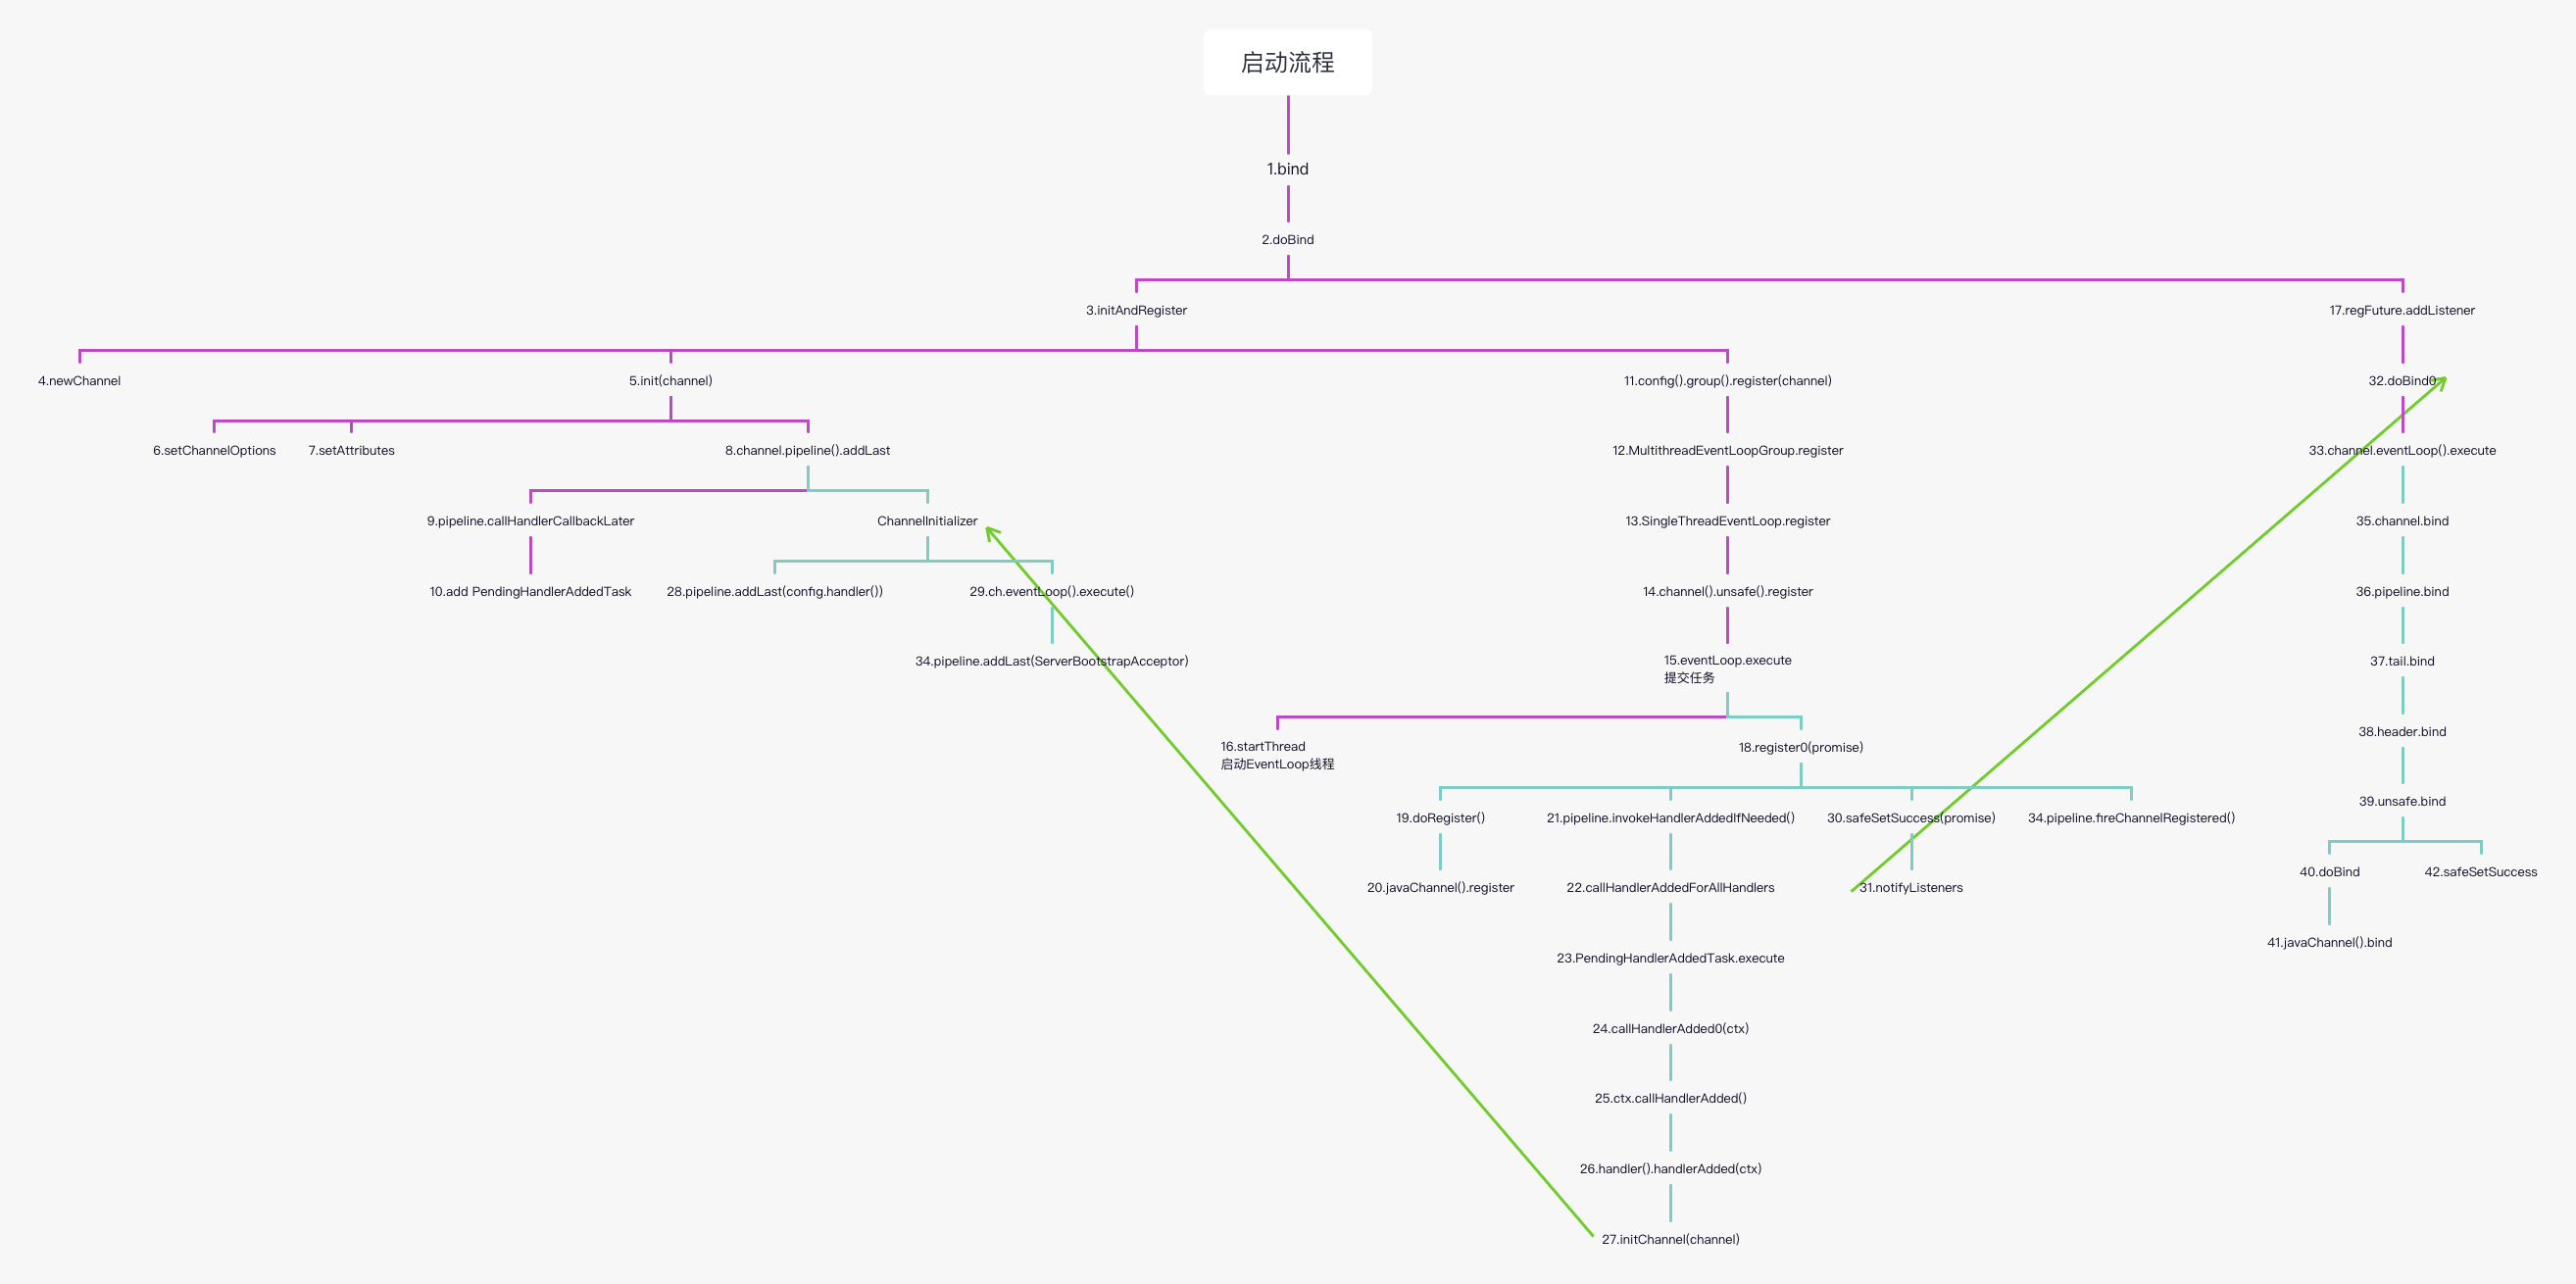
netty 的启动流程
首先看下 initAndRegister 的执行流程,它负责创建和初始化 channel,并将其注册到 EventLoop 上,同时将原生的 java channel 注册到 selector 上。
newChannel 和 initChannel

init channel
newChannel
netty 首先使用 channelFactory.newChannel 创建一个 channel 的实例,它的类型是在配置 ServerBootstrap 时指定的 .channel(NioServerSocketChannel.class)
很显然要通过反射创建的实例
1 | public T newChannel() { |
initChannel
在创建好 channel 实例之后,先要设置它的属性,这些都可以通过 ServerBootstrap 进行配置
1 | setChannelOptions(channel, newOptionsArray(), logger); |
然后获取 channel 的 pipeline,注意每个 channel 会对应一个 pipeline。拿到 pipeline 之后会调用其 addLast 方法注册一个 ChannelInitializer
1 | p.addLast(new ChannelInitializer<Channel>() { |
跟踪其调用流程,最终会执行如下代码
1 | // DefaultChannelPipeline#callHandlerCallbackLater |
此时 pendingHandlerCallbackHead 链表为空,并且调用该方法时入参 add 为 true,因此会将 head 设置为 PendingHandlerAddedTask。
我们来看下 PendingHandlerAddedTask 的代码
1 | private final class PendingHandlerAddedTask extends PendingHandlerCallback { |
它是 PendingHandlerCallback 的子类,它的职责是调用 callHandlerAdded0 方法触发 handler 的添加事件。
因为此时并不会触发其执行,所以暂且不去看内部逻辑,待后面调用到时再做分析
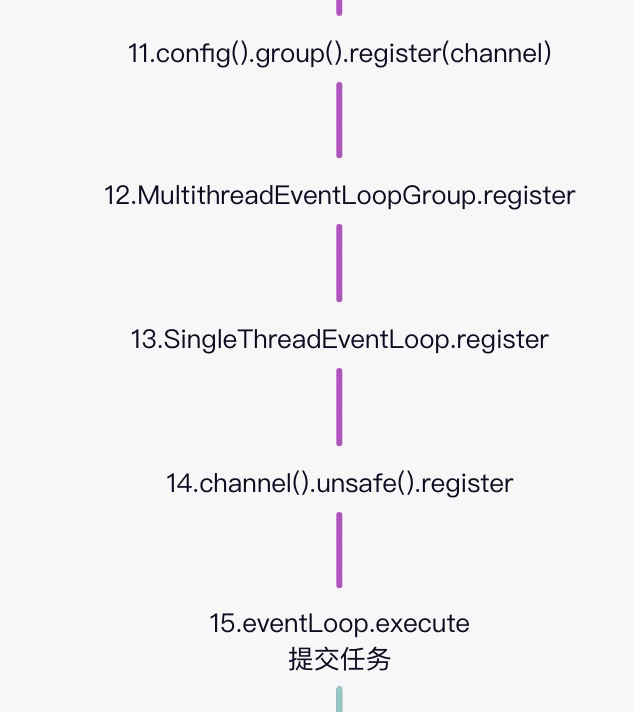
register
register
Channel 初始化好之后,接下来要将其注册到 EventLoop 上
1 | config().group().register(channel) |
config().group() 用于获取 ServerBootstrap 配置的 EventLoopGroup,拿到 EventLoopGroup 之后再调用其 register 方法
MultithreadEventLoopGroup.register 方法实现如下
1 | return next().register(channel); |
它先获取一个 EventLoop,然后调用其 register 方法。继续跟踪到 SingleThreadEventLoop 的 register 方法实现
1 | promise.channel().unsafe().register(this, promise); |
它是先获取 channel 的内部属性 unsafe,然后调用其 register 方法,如下是其核心代码
1 | if (eventLoop.inEventLoop()) { |
因为此时是在主线程中执行,所以会执行到第 6 行,往 EventLoop 中提交一个任务,用于完成 register0 操作,可以将其记做任务一
register0 需要等到 EventLoop 调度后执行。
那么 EventLoop 是在什么时候启动的呢?这需要跟进到 eventLoop.execute 内部
1 | private void execute(Runnable task, boolean immediate) { |
因为此时是在主线程中执行,而不是 EventLoop 线程,所以除了会将任务添加到执行队列外,还会启动线程,之后 EventLoop 就进入到循环中,开始处理任务
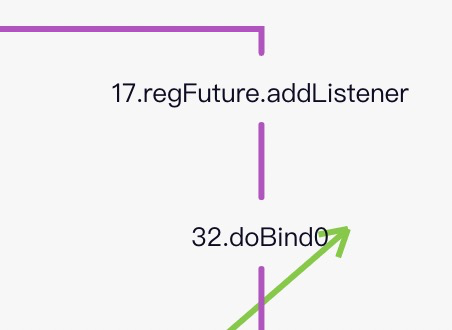
regFuture.addListener
regFuture.addListener
回到 doBind,在 initAndRegister 执行完之后,因为是异步操作 regFuture 还未完成,所以会调用 regFuture.addListener 注册一个 FutureListener ,以便等到注册完成之后执行 doBind0 操作
1 | final PendingRegistrationPromise promise = new PendingRegistrationPromise(channel); |
register0
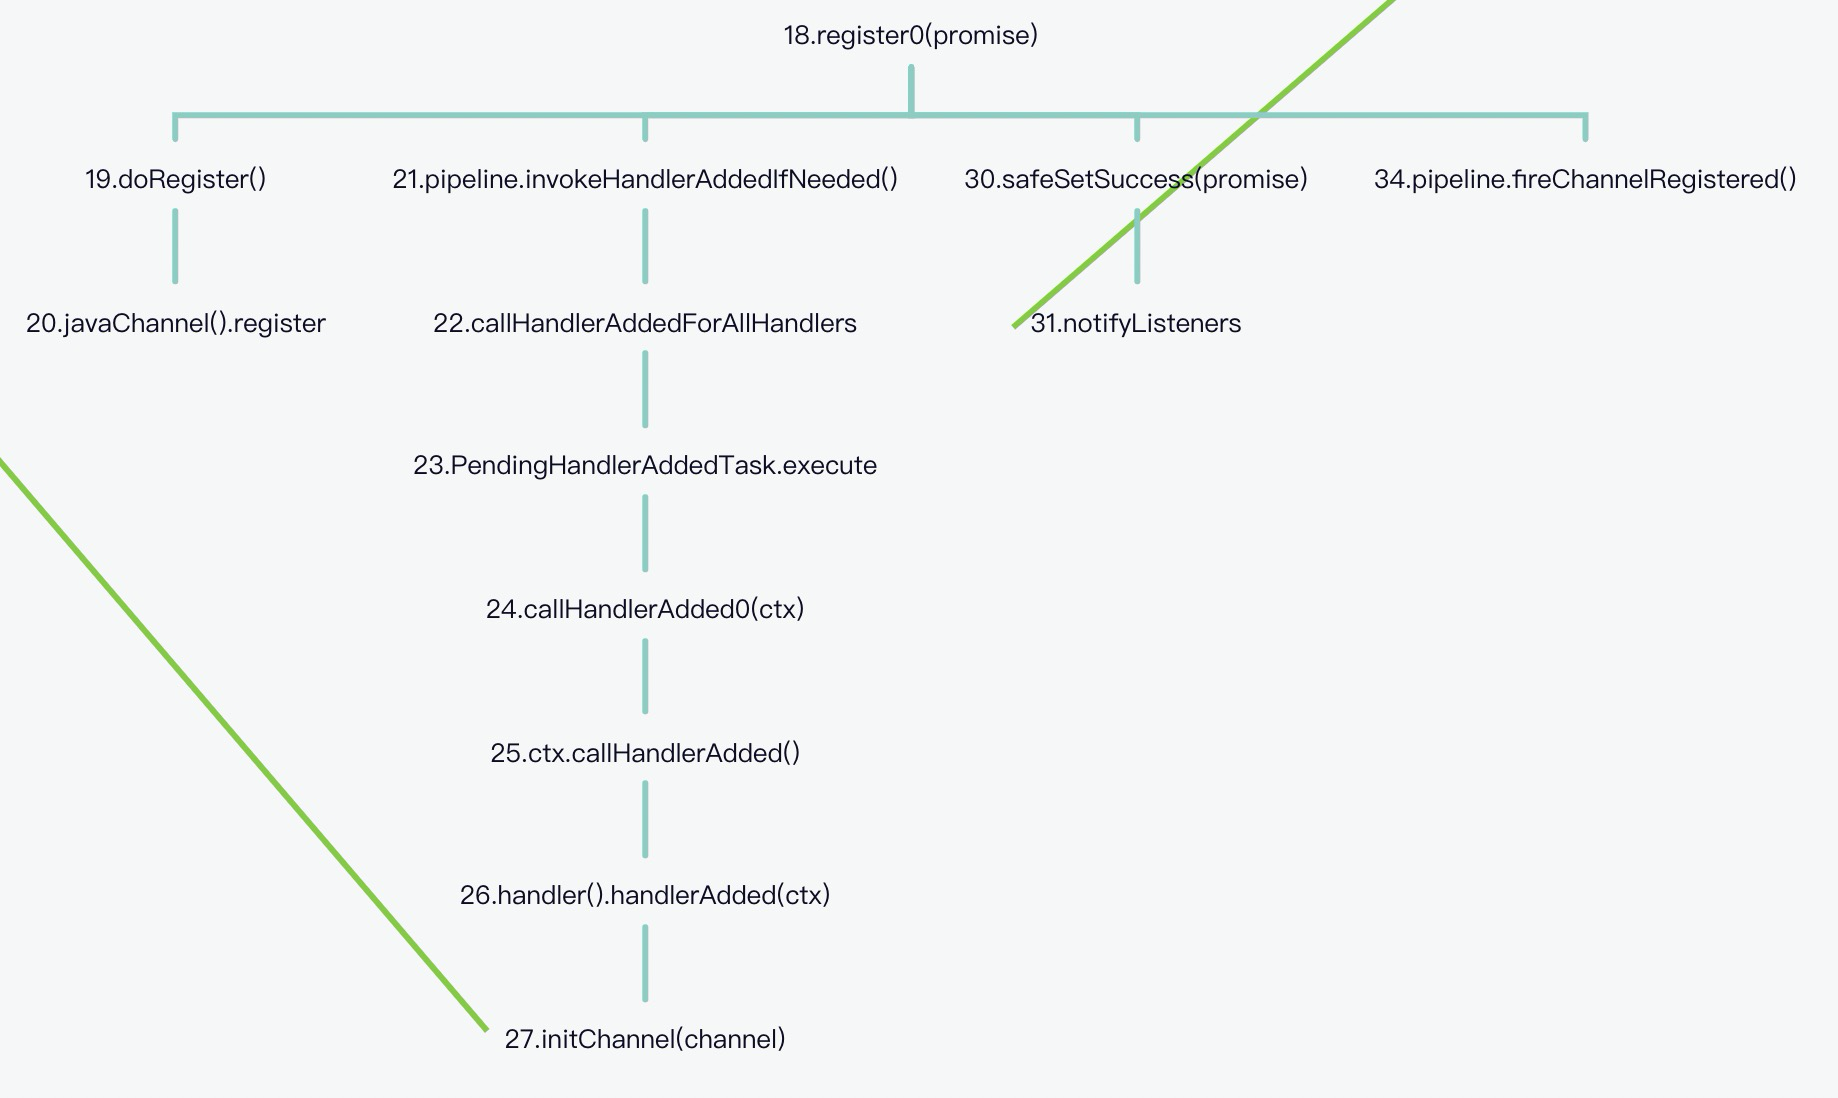
再回到 register,这次是因为 EventLoop 已经开始执行,取到了 任务一 并执行,也就是说开始执行 register0 操作了
register0
doRegister
将内部的 java channel 注册到 selector 上
1 | protected void doRegister() throws Exception { |
注意第五行的 this 是 netty 的 channel,对于本文的场景实际是 NioServerSocketChannel。这样做的目的是将其作为 attachment 存储在 selectionKey 上,方便后面使用
pipeline.invokeHandlerAddedIfNeeded
它的调用链路比较长,简单来讲就是执行 pipeline 上所有的 PendingHandlerCallback,对于本文的场景就是执行 initChannel 时添加的 PendingHandlerAddedTask
DefaultChannelPipeline.callHandlerAdded0 -> AbstractChannelHandlerContext.callHandlerAdded -> ChannelInitializer.handlerAdded -> ChannelInitializer.initChannel
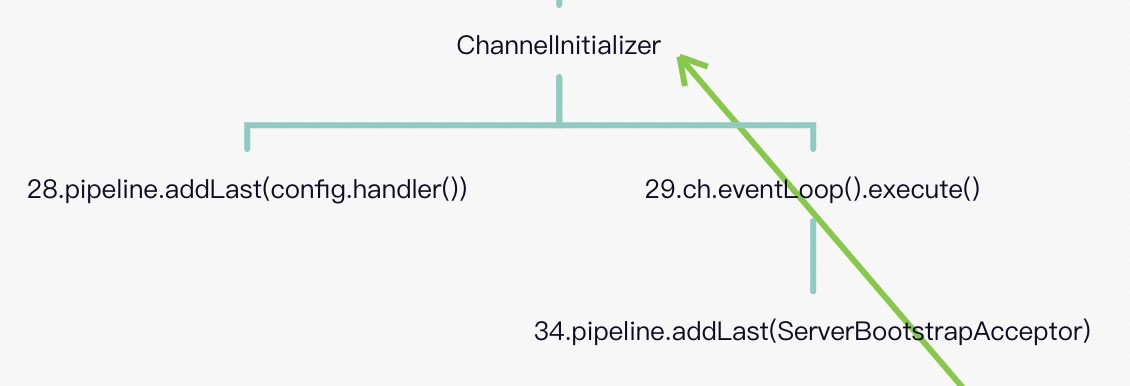
可以看到最终会执行 ChannelInitializer.initChannel 方法,那么这个 ChannelInitializer 是什么呢?
pipeline.invokeHandlerAddedIfNeeded
它实际上是在 initChannel 时添加的,再回顾下代码
1 | p.addLast(new ChannelInitializer<Channel>() { |
它的作用是将用户配置的 handler 添加到 pipeline,并且往 EventLoop 提交一个任务,这个任务是往 pipeline 添加 ServerBootstrapAcceptor,我们把这个任务记做任务二
safeSetSuccess
更新 future 的状态为成功,同时通知所有的 listener。这里只有一个 listener,它是在 regFuture.addListener 执行时添加的,再次回顾下代码
1 | final PendingRegistrationPromise promise = new PendingRegistrationPromise(channel); |
很明显会触发 doBind0 的执行
doBind0
1 | private static void doBind0( |
它是往 EventLoop 中提交了一个任务,通过 EventLoop 执行 channel.bind 操作。我们把这个任务记做任务三
执行任务二
EventLoop 取出任务二执行,将 ServerBootstrapAcceptor 添加到 pipeline 上
1 | pipeline.addLast(new ServerBootstrapAcceptor(ch, currentChildGroup, currentChildHandler, currentChildOptions, currentChildAttrs)); |
执行任务三
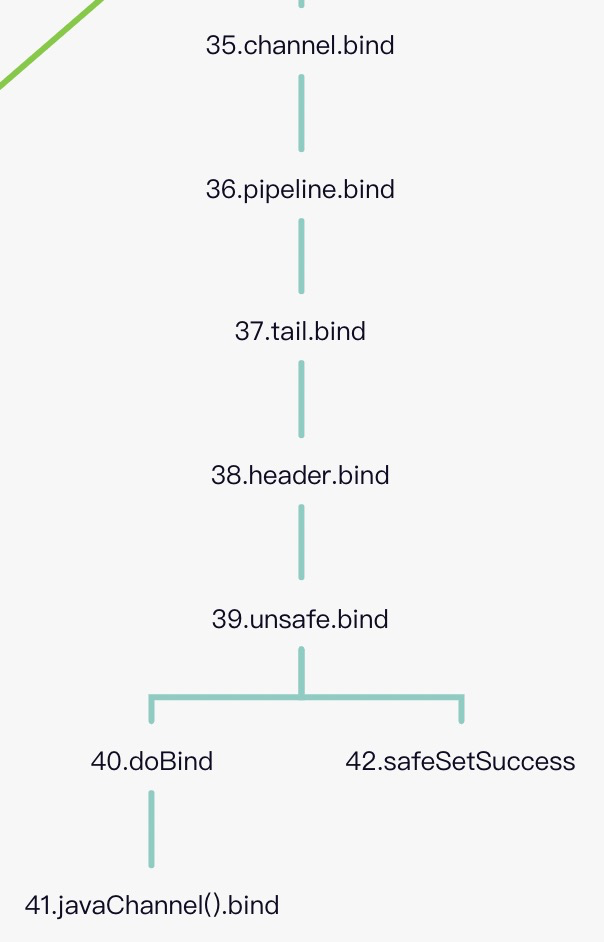
EventLoop 取出任务三并执行
1 | channel.bind(localAddress, promise).addListener(ChannelFutureListener.CLOSE_ON_FAILURE); |
执行任务三
bind 操作通过 pipeline 进行传递,从 tail 传递到 head,最终通过 head 调用 unsafe.bind 方法
1 | boolean wasActive = isActive(); |
doBind 依赖于具体的 channel 实现,这里是 NioServerSocketChannel ,直接调用 java channel 的 bind 方法
1 | protected void doBind(SocketAddress localAddress) throws Exception { |
safeSetSuccess 修改 future 状态为成功,通知所有的 listener bind 事件已执行完
- 2022-01-30
在上一篇文章中,我们了解了如何通过 netty 实现一个 echo server。你应该还记得
ServerBootstrap启动类,它负责 server 的启动管理,在启动前我们需要为其配置EventLoopGroup。EventLoopGroup有配套的ServerSocketChannel,比如通常使用最多的是NioEventLoopGroup,它就需要和NioServerSocketChannel搭配起来工作。 - 2021-01-26
ServerBootstrap 启动时需要初始化 ServerSocketChannel 并将其绑定到 EventLoop 上,用于处理该 channel 上产生的各种事件。那么 ServerSocketChannel 是如何完成创建和初始化的?又是如何绑定到 EventLoop 上的?
- 2021-02-05
netty 中每个 channel 都会绑定了一个 pipeline,当有入站事件或出站操作时,会由 pipeline 中的 handler 进行拦截处理。
- 2021-02-26
对于一个 Netty client 来说,在配置好
Bootstrap之后,通过调用其connect方法来连接到远程服务端,如下所示1
2
3
4Bootstrap b = new Bootstrap();
b.group(group)
...
ChannelFuture f = b.connect(HOST, PORT).sync(); - 2021-01-02
netty 中的 channel 在完成创建和初始化之后,需要注册到 EventLoopGroup 上,这本质上是交给 EventLoop 管理 channel 的各种事件。一个 EventLoopGroup 管理了多个 EventLoop,那么在注册 channel 时,EventLoopGroup 就需要选择一个 EventLoop,然后将其和 channel 关联起来。选择 EventLoop 是一个很高频的操作,该操作是否高效会直接影响 netty 的性能,本文就来聊下 EventLoop 的选择策略。
预览: